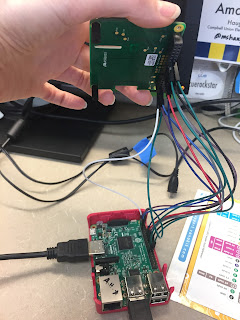
Sense Hat pinout for Raspberry Pi
Recently I wanted to attached a Sense Hat to my Raspberry Pi without using all 40 GPIO pins. My plan was to attach an additional output device to the pins to use at the same time as the Sense Hat. I'd also read that if I was going to use the temperature sensor on the Sense Hat, the temperature of the computer itself tends to interfere with the temperature readings of the atmosphere when the Hat is plugged directly onto the GPIO pins.
 One option-- buy a pin header with extra long pins. Easy access to GPIOs! As I mentioned above, though, if you want to use the Sense Hat for reading the temperature, the Pi itself can interfere when your Hat is too close to the Pi board. If you don't need any of the other GPIO pins, it is also easy enough to use a GPIO cable extender to connect your Sense Hat without attaching it directly onto the Pi itself.
But, if you want to attach additional outputs to your Raspberry Pi, using all 40 pins for the Sense Hat can be a bit of an inconvenience. The good news is, the Sense Hat really only needs 11 of the pins in order to work-- the trick is knowing which ones!
As I started Googling around, a number of people recommended just using the Sense Hat schematics to figure it all out. If you are an electronics novice, though, like I am, the schematics can be tricky to navigate. Pinout.xyz is a helpful site and got me close, but unfortunately, the Pinout site did not include 2 crucial pins in their diagram (I think assuming those with more experience would already know to include those). Luckily, I found some help from the Raspberry Pi community on the official website discussion forum. From there, I created my own diagram to help me remember which specific pins I needed in order to use my Sense Hat without using up all 40 GPIO pins.
That diagram is below for your use!
(It does not matter which 3.3V, 5V or ground pins you use just as long as you include those.)


Does the Sense Hat not have pass-throughs the way the Adafruit Motor Hat does? I currently have an accelerometer connected to the Motor Hat which is header mounted to the Raspberry Pi, i.e. connected to all of the GPIO pins.
ReplyDeleteWhich wouldn't help with the temperature problem but might be useful for other cases.
It does! So yes, using an extra long pin header is totally an option. But like you mentioned, my issue was getting an accurate reading on temp sensor so I liked being able to use something I had laying around (i.e. jumper cables) to solve my problem.
Deletevery interesting , I use the Pimoroni hackr3 board to get my sense hat away from the heat of the pi,the board has 3 sets of pins ,so it runs the sense hat ,and you then could use the other set to have access to the unused pins , my sense hat --- https://plus.google.com/u/0/photos/photo/100931101162265604587/6362981796243711346?icm=false
ReplyDeletepimoroni hackr3 mini board
Deletehttps://shop.pimoroni.com/products/mini-black-hat-hack3r
Thank you so much for the diagram!
ReplyDeleteThank you, it's a big help!
ReplyDeleteThanks for your blog, I can make R-Pi rober!
ReplyDeleteThanks a lot!!
That's great-- happy making!
Delete